Happy Holidays!

December 17, 2022: Hi all. I'm still here, just been very busy (who of us is not?) I'm working on updating Maison Newton bit by bit, it's been awhile since I changed things up. Happy Holidays to all, soon the Winter Solstice will arrive and then the days will start to get longer once again, hooray!

Saturday, January 27, 2018

Another Need (Versus Want) Satisfied: Mercury Glass Lamps

Hola!  Today is the last day in the second January thaw we've had this month.  Sometimes we don't get one at all; this year, we had two!  Today we hit a high of 47 degrees F away from Lake Michigan and it was sunny all day long.  The snow that I awakened to on Monday that had coated everything a week ago Sunday into Monday and turned the city into a winter wonder land:

Shortly after sunrise on Monday January 22, 2018
has all melted away over the past week, leaving just a few tell-tale signs where the sunshine doesn't quit hit yet:

Half an hour to sundown on Saturday January 27, 2018

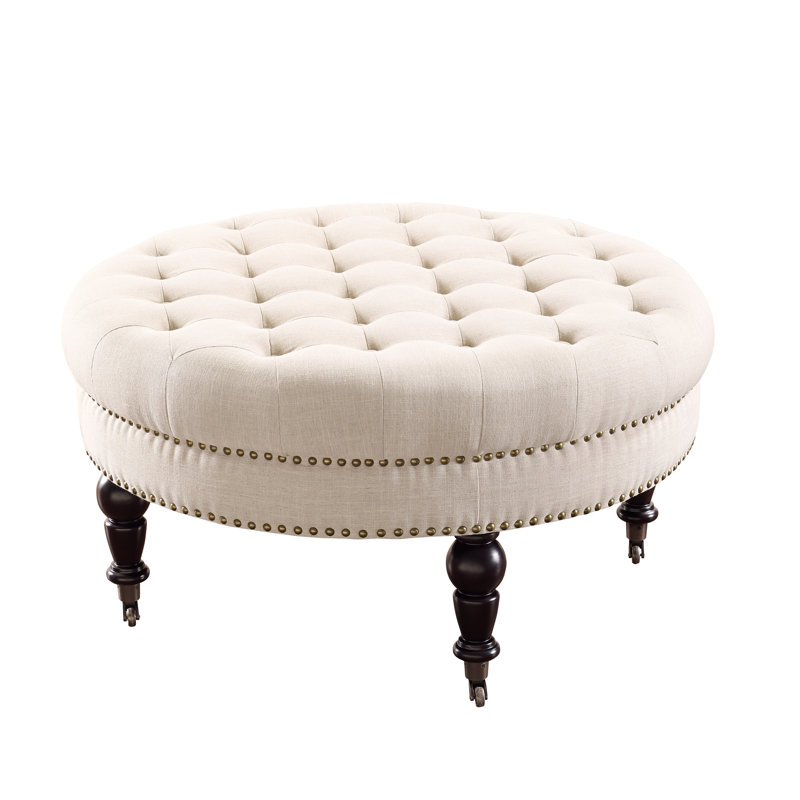
I finally got the Christmas tree from in front of the living room window wrapped in its white shroud to keep dust and ick off (it's an old full/queen size duvet cover) all the way through the house and down those endless steep basement stairs to China, er, storage in the basement.  The living room has been rearranged back to its usual configuration, but with the new round upholstered tufted ottoman replacing my square wood coffee table.  What a difference that single change has made, it is amazing how different the room looks now!

I made a few other changes to the living room at well.  Since I wanted to keep my elephant lamp in the room, I brought up a round table from the wreck room and parked that near one side of the fireplace.  The elephant lamp now holds court on it.  I added a new pair of matching lamps to the console table that sits behind the sofa in front of the picture window where the elephant lamp used to sit.

I also dug out of storage an old small round glass and "brass" 3-legged catch-all table that I think I paid $10 at a Woolworth's Dime Store years ago (that's how old some of my stuff is, LOL!)  It is light weight and can easily be shuttled around the room to hold drinks and plates when the tray on the ottoman is in use.  More about that in a future post.

I will also be writing more about the trauma and uncertainty of my first decorating - oh, sorry, "styling" -  foray into arranging items on the tray that now sits on my upholstered ottoman.  Oh boy!  Deciding on a Supreme Court nominee would be far easier, let me tell you...

This latest change started last summer, when I began feeling that the living room needed another lamp, not just an accent lamp on top of the fireplace mantel, and I wasn't satisfied with anything in my collection of old retired lamps that seem to breed magically while in basement storage.  What do you do with old lamps that are still perfectly fine, you're just sick of them?  All of them are out of style, or far removed from where my current decorating tastes lie.  I sometimes wonder "What was I thinking?," when I see the sorry troop. 

I settled upon the idea of buying a pair of lamps to anchor the console table and introduce some symmetry into the room, lamps that would fit into my frugal budget and maybe something to satisfy my long-standing itch for mercury glass.

So what did I do one Saturday morning?  I visited Horchow online. 

Now that was an incredibly dumb thing to do.  I LOVE Horchow, and I absolutely CANNOT AFFORD Horchow.  LOL!  But I visited anyway, and fell in love with this lamp:

Genie Glass lamp

This beauty is the Genie Glass lamp in silver, on a square crystal base.  Oh, be still my heart! Cost: $249.00.  Sorry, Horchow.  Genie is more expensive and taller than I wanted in a lamp, a statuesque 31".  But oh my, she is soooooo gorgeous.  Sigh.

So, off on the hunt I went.  And of course, I was frustrated to no end.  I looked for a few days online to no avail, I could not find anything that I thought closely enough resembled Genie.  I found tons of very pretty mercury glass and silver-colored lamps, and of course the more expensive they were, the more I loved some of them.  WHY does that happen?  It's like daydreaming about what Prince William looked like twelve years ago when he still had all of his hair while I'm old enough to be his grandmother.  Yes - I must be warped.

I checked the usual:  Overstock, Wayfair, Kirklands, Penney's (I have purchased several lamps from Penney's over the years), did a Google shopping search, yada yada yada.  I just didn't find anything that really rang my chimes enough to consider buying one, let alone two.  Eventually I ended up at Target's website because I knew they had lamps, catered to a more modern aesthetic in some of their lines (like Threshold) and generally are moderately priced.  I hit paydirt!

I ended up purchasing two Large Mercury Glass Trophy Lamps, at a wee little discounted price of $36.09 each (regular price $37.99).  Right now, though, they are on sale for even less:  $26.59.


I also purchased two large black lamp shades lined in gold for $19.99 each.  They are also now on sale for $13.99 each.  Yikes!  With free shipping, my total bill was around $113 plus Wisconsin's 5.65% sales tax.  I could have bought four lamps and shades for less than the price of one Genie lamp.  Sorry, Genie.  

The lamps are 17" tall; the shades I purchased are 10" high, 13" wide at the top, 15" wide at the bottom a "threaded uno" shade fitter, it snugs down on the lamp socket.  Because of how the shade fits on the lamp, the total height of my base plus shade is 24", they are just the right height.

I tried to copy one thing from Genie - her crystal base.  Glass was more expensive than acrylic, so I purchased 6" square 1/2" thick acrylic bases for the lamps to rest on.  The lamps are open across the bottom, so I wanted to rest them on some kind of base.

Here are my lamps, now elegantly in place on the console table in the living room:


A look at the acrylic square bases I rested the lamps on

The Threshold lamps are a lot different than the model Genie lamp in both shape and cost, for sure.  But I am delighted with them and the touch of sophistication I feel they've brought to the room.  Very happy camper!  

Tuesday, January 23, 2018

Finally Bought A Tufted Round Ottoman!

Hola everyone!  I've wanted one for years, but never pulled the trigger to actually buy one.

Here it is - TA DA!  

But on January 13, 2018, after years of dithering should I or shouldn't I because I still own two perfectly fine coffee tables, I finally decided to do some online shopping to see if I could find a good bargain on a nice looking round tufted ottoman that would be large enough to serve as a footstool and as a coffee table.

I checked lots of different websites, so many I can't remember them all, including Overstock, Wayfair, Joss & Main, Google Shopping, etc., looking for the best deal.  I tend to do overkill always looking for a few more dollars off.  Below are just some of the sites I visited and what I found.

Joss and Main
Ravi Tufted Ottoman
Ravi Tufted Ottoman 34.6" diameter, 18.13" height, black turned wood legs with metal casters, in "Natural" linen (polyester blend), sale price $327.99; regular price listed at $452.99

I really liked this ottoman.  It was a good height to go with my sofa and wing chairs, and I was looking for a color as close as I could get to the creamy/natural color of those pieces.  My sofa is a modern Tuxedo style tufted (without buttons) in a solid linen-look creamy colored fabric, and my modern-style wing chairs are covered in a large modern floral print in tones of charcoal, grey, and taupe on a creamy colored background linen-look fabric.  I also loved the "lux" details of the turned wood legs in a dark finish (mine look black), the burnished metal casters, and the double row of burnished metal nailhead trim.  The nailhead trim matches that on my dining room chairs and table.  Since the rooms are open to each other, I want my decor to flow and relate from room to room without being matchy.  These details add to the cohesion of the two rooms. 

But I didn't want to pay $328 on sale for the ottoman.  I was looking to keep my budget as close to $100 as possible.  Yeah, cray cray.  But I kept at it, shopping to see if I could find THIS ottoman or one similar enough that I could do a convincing "look for less."  Way less. 

Here are some of what I found: 

Home Depot (Canada):

Linon Home Decor Products
Linen Round Tufted Ottoman 34.63" diameter, 18.13"height, black turned wood legs with metal casters, in "Natural," $234.00.  (I wasn't sure if I'd be able to buy this from Canada without paying a duty tax or what shipping charges would add to the cost.)

Bed Bath & Beyond:

Isabelle Round Tufted Ottoman, 34.6" diameter, 18.13" height, turned wood legs with metal casters, linen-look material, $219.99.

Houzz:
Identical looking to the three ottomans above, Isabelle Round Tufted Ottoman, 34.6" diameter, 18.13" height, dark Espresso finished legs, "natural linen" upholstery, $159.99 on sale, regular price $460.99. 

Also found at Target for $230.99 ("beige" fabric color) and Amazon for $135.99. 

Then I remembered some commercials I've been seeing on streaming live television - check eBay!  And so, I did.  Lo and behold, I hit a winner.

I ended up purchasing what as far as I can tell is an identical ottoman at eBay.  Although now the price at the eBay vendor I purchased my ottoman from is listing its price at $129.95, I paid $119.95 and got free shipping (many of the sites above also offered free shipping).  The eBay dimensions are a bit smaller than the Joss & Main "Ravi" ottoman, ebay stating the diameter as 33 1/2" and height as 17 3/4", linen fabric in "beige." 

I unboxed it yesterday evening after it sat in my kitchen for a few days.  Assembly was easy, just opening up the velcro lining flap on the bottom of the ottoman to pull out the legs and then screwing them into place in pre-drilled holes.  The piece is from Belleze Furniture Company. 

I am in love love love!  The height is perfect.  The product was in perfect condition when I unboxed it and just as pictured.  The color is just a pinch darker than that of my sofa but really not noticeable unless you're looking for it.

I finally got my wee little bit of lux for a truly bargain price and am thrilled.  Now I just have to lug my heavy wood coffee table to the basement without killing myself.  But I'm going to take a nap first to gin up my energy level again; I shoveled first thing this morning because we had 3 inches of wet heavy snow dumped on us overnight.  UGH!

Tuesday, January 9, 2018

It's Cooking Time! Alfredo Chicken Mashed Potato Casserole

Hola!

This is the time of year, when it's bitterly cold outside, the sidewalks are iced over and it's not safe for this woman who mainly travels on foot and by bus to be out and about much, to batten down the hatches and work inside my comfy and cozy retirement nest!  I experiment with cooking on days like this.

On Sunday I got an idea for a recipe because I wanted to use an older frozen package of mixed veggies in my freezer and I did not want to make my usual easy-peasy version of ground beef Shepherd's pie.  I outlined the recipe in my head and today I picked up the remaining ingredients to put the dish together.  It's sort of a take on a chicken pot pie - but in a large casserole, with mashed potatoes rather than a crust, and Alfredo sauce rather than a classic beef gravy or tomato-base that is used in traditional Shepherd's Pie or a smaller crusted version of a chicken pot pie.

Sorry for the photo of the already partially eaten casserole.  I didn't think about blogging this until after I'd already dug into the casserole for supper! 


The basics are easy:

Ingredients:

-- One pound (more or less) of chicken tenders, cut into about 1 inch size
-- One standard size (I believe it is 8 ounce) jar of ready-made Alfredo sauce (I used Prego brand because it was on sale and I have used and liked other Prego ready-made sauces)
-- One 8-ounce package of frozen mixed vegetables (peas, carrots, green beans)
-- Eight "servings" (per package) of instant mashed potatoes, made per directions on package.  I went the lazy cook's way, you can also make yours from scratch!

Directions: 

-- I cooked the cut-up chicken in a large frying pan/skillet.  I added about 3/4 teaspoon of salt to the chicken in a few tablespoons of olive oil and cooked quickly on high/medium heat.
-- Meanwhile, frozen veggies were made in microwave in a 1.5 quart covered casserole dish per package directions.
-- The cooked veggies (drain if necessary) were added to the cooked chicken in the large frying pan.
-- Entire jar of Alfredo sauce was added to and mixed into cooked chicken and veggies in the frying pan.
-- A "crust" of mashed potatoes was spread across the bottom of the (now empty) casserole dish that I'd used to cook the frozen veggies. 
-- The chicken/veggies/ Alfred sauce mixture was then poured over the "crust" of mashed potatoes in the casserole dish and topped with the rest of the mashed potatoes.
-- Baked for 40-45 minutes at 350 degrees F, uncovered, long enough for peaks on mashed potato top of casserole to brown on peaks and form a mild crust.  If you want crustier potatoes/more browned peaks, bake longer.  The sauce was bubbling up all around the sides of the casserole.

After cooling the casserole (still uncovered) for about 20 minutes inside the now opened oven (to let the heat into the house), I served myself up a dish and oh boy - it was GOOD! 

Easy to make, makes a LOT - I will have enough for at least six-seven more meals and will freeze most in individual servings.  This is a rich and hearty dish for a cold winter's day.  YUM!


NOTES:  I will make my mashed potatoes "drier" next time I make this dish, because even though I baked the casserole uncovered and also made sure there was no excess water in the cooked veggies, adding a full jar of Alfredo sauce made the casserole "wet."  The mashed potatoes did not turn to mush, but if you want them to have more body, add extra dry flakes to your instant mashed potatoes (if you use instant like I did) to make them stiffer.  If you make your mashed potatoes from scratch, use less milk and butter than you normally do to make a stiffer potato.  Increasing baking temperature (I use 350 degrees F as my default setting for most of the casseroles I make) and/or extending baking time may also help "dry" the casserole out a bit, too.  This will depend on your personal preferences.

Saturday, January 6, 2018

A Look for Less: Ballard Designs "Petite Indigo Botanical Art"

Hola everyone!

The weatherman has promised us temperatures rising into the 20s by tomorow and into the mid 30s by next week, fingers crossed.  Even a few days of relief from this bitter cold will be welcome.

House bound except for extremely necessary and brief as I can make them errands (like quick walks to the Family Dollar for bread, milk and peanuts for the squirrels and the liquor store in the same shopping strip for wine - not for the squirrels), I am already itching for spring and fluffing up Maison Newton.  When I'm in the "fluffing up" mood I look at a lot of decorating sites, shops, etc., but I usually don't buy.  LOL!  That being said, today I felt the urge to do a "look for less" post - I haven't done one in ages and I do enjoy viewing websites like "Copy Cat Chic" and the High/Low articles in HGTV's monthly design magazine.  I wish Sabrina Soho's "The High/Low Project" was still on, sigh. 

I headed over to Ballard Designs, a favorite site for inspiration and way out of any price I would ever pay for anything they sell - even on super-sale, and looked around.  There, I came across these lovely botanical prints on sale:

Petite Indigo Botanical Art.  Normally each print is $75, right now on sale for 25% off, a net price of $56.25 each.  The size is large (well, I consider it large):  15 x 18 1/4, wood frame 1" deep with silver finish and glass over artwork. I think they are gorgeous!

Buying all four prints even on sale would be outside of my budget: $225.00 at the sale price or $300.00 at the regular price, and that doesn't include shipping or possibly sales taxes.  Yikes! 

So, being the type of home decorator who wants it inexpensive, fast and easy, who frames pretty greeting cards that I fall in love with and prints things for free off the internet (or cuts up calendars) for framing, here's my let's cut this price way way down attempt at duplicating the Ballard Designs prints!

First stop, the Simply Made by Rebecca website, where she just happens to have cached free printable botanicals of the blue hue variety, yippee!  Standard print-out is on 8 1/2 x 11 paper, but she also provides a downloadable/uploadable option for 11 x 14 paper that you can upload to a commercial printer or do on your own printer if you have that size option available (I don't).  NOTHING MUCH BETTER THAN BEAUTIFUL AND FREE!  Here are the four I would choose:


Second stop, Ikea to look for inexpensive picture frames.  Rebecca recommended the Jallvik wood frame, but I could not find it at Ikea online, so I guess it's not available any more.  However, Ikea does have an assortment of different colored woodish frames, among which I thought the Silverhojden Frame might do the trick.  It is made from wood products (not solid wood) and has a faux "foil" finish (not painted finish), and has a polystyrene cover over the art rather than glass, so it depends if you like the look or the safety of polystyrene over glass if there should be an accident with the frame:

Silverhojden Frame by Ikea, $7.99
Finish: Silver color
12 x 16 without mat
7 1/2 x 9 1/2 with mat
Outer frame: 13 x 17

If you buy four of these frames, it would cost you approximately $32.00 plus shipping, and maybe sales tax depending upon your state.  Far cry from $225.00 or $300.00, before adding shipping and possible sales taxes if you purchased the framed prints from Ballard Designs. 

I would float an 8 1/2 x 11 (letter size) print-out on my home computer of each botanical over the mat inside the purchased frame or remove the mat altogether and add some white lining paper cut to size underneath, rather than cutting off some of the beautiful print by placing it underneath the mat, which would reveal only a 7 1/2 x 9 1/2 size!  The overall 13 x 17 Ikea frame size would be just a bit smaller than Ballard Design's outer frame size of 15 x 18 1/4, but I think the overall impact would be pretty much the same.

You may already have your favorite budget-family wood (or wood look) with glass frames that you buy from your favorite craft or art-supplies store/source (Michaels, Jo-Ann Fabrics, Hobby Lobby, etc.), and could paint up the frames to get a silvery look if they don't come in a silver-toned finish (or not, if you don't care for silver).  Or you could go with an 11 x 14 size, have the prints commercially printed at FedEx uploaded from your smart phone or tablet and fill the entire frame with the print - similar to the look of the Ballard Designs prints, which float across the entire width and length of the frames.  If you purchase a 1" width frame, the outer dimensions would finish at 12 x 15 (compared to 13 x 17 for the Ikea and my Family Dollar frame [see below] versus Ballard Design's outer frame measurement of 15 x 18 1/4). 

You could also get thither to thy favorite dollar store or thrift shop and look for an 11 x 14 or more custom-sized frame.  This one that I now have hosting a horse print (cut from my 2017 calendar), has glass over the artwork and a champagne colored inner edging on the frame, so I would leave it as is rather than trying to give it a silvery finish (not my favorite finish anyway).  Bonus: its dimensions are identical to the Ikea Silverhojden frame, but only costs $3.00:


Four of those on a wall would pack a big punch and cost $12 to $16 (if your store charges $3.99 instead of $3.00) plus sales tax.

Or, go cost free except for the cost of paint or silver-leaf (if you refinish), if you might have a stash of old frames, like I do.  I bought the $3 Family Dollar frame because I didn't like the supply of 11 x 14 and somewhat larger frames I already have in my stash for the space I wanted to fill and I did not want to have to bother with refinishing to black to match my existing decor. 

TA DA!  There you have it.

Thursday, January 4, 2018

Deconstructing Christmas in the Kitchen - Decorating Kitchen for Winter to Spring

Hola!  It's that time of year again.  New Year's has come and gone and the Christmas decor, which has been up since early December, is being packed up and taken down to the shelves in the basement to rest for another year.

The big tree in the living room will remain up until Three Kings' Day on January 6th.  Yeah, I'm a sappy sentimental type of gal :)  The first Three Kings' Day I celebrated was with my Mr. Don in Madrid, Spain on January 6, 2012.  To see the large parade, we stood for hours to hold a place on the Paseo del Prado, a lovely large boulevard upon which the Prado Museum and many other revered museums and organizations are located. That trip had been scheduled to celebrate about 10 years since our first trip to Madrid in October 2002.  One of my all time favorite pictures of us as a couple is this one (taken during that 2002 Madrid trip, on a side-trip to see the ancient city of Toledo - this was taken before we walked over the St. Martin's Bridge seen behind us and a river far far below to get to the ancient city built on a high place).  It sits on my bookcase/storage unit in the kitchen, where I see it many times every day:


He was serenading me as an obliging lady from our tour bus snapped our photo, LOL!  Sadly, our January 2012 trip back to visit Madrid was the last trip we would share together, as Mr. Don passed away in October 2012, but I will always remember our two trips to Spain and the wonderful fun-and-adventure-filled years we spent together travelling, exploring shops, museums, restaurants, playing chess and writing our blogs.

Deprived of all it's Christmas dressing, the kitchen looks rather barren to me now, LOL.  Isn't that always the case when the Christmas decor comes down and things aren't bright, festive and shining with lights, ornaments and glitter everywhere, sigh.  Still, I can definitely notice now that it is staying light longer in the evening and getting light outside a little bit earlier than a week ago, so I won't complain too loudly.  This is how the kitchen looks now, mid-redo:

From the entrance into the dinette area from living room.

From one corner of the kitchen looking at the dinette and kitchen driveway entrance,
patio door, and my breakfast bar area.


These are dried out hydrangeas that I clipped from the side garden along the driveway.
Amazingly, they held up under 60 plus mph winds, pounding rain storms,
several freezes, snow, and more winds, winds, winds!  I wanted to put something
on the table as the lantern I had on it during the fall leading up to Christmas is
currently on the mantle in the living room.  The bouquet is wintry, and also reminds me
that spring will be here in 3 months - well, at least astronomical spring.

This is the bookcase/storage unit I bought and put together to cover the
side of the fridge and provide a convenient place to remove stuff from the
countertops and for my cookbooks, more storage behind the uneven doors.
I have tried several times to get those doors to hang evenly, and have failed
miserably.  I also have to open them rather gingerly, as they have a tendency
to fall off, LOL!  Good thing there is no one else living here, especially kids!  
You may remember the inspiration photos for adding this bookcase/storage unit to my own kitchen design:

Way fancier than mine, as it was framed in complete with crown
molding and there are cabinets above the fridge.  My goal was
similar though, covering up the side of the fridge open to the dinette
with something functional and attractive.

Same idea as first inspiration photo, different color (love the grey!)
I chose a white modern/clean look for my bookcase because the cabinets will eventually be painted white. I chose a unit with enclosed storage space to stash
the large supply of nuts I feed to all the city's squirrel population, or so it seems
sometimes!

I swapped out the cardinal Christmas greeting card collage for this
lovely horse print from my 2017 calendar.  Horse art doesn't have to be expensive :)
The colors work perfectly in the room and it will be there until covered up
next Christmas season by the cardinal card collage.  

Last photo: the kitchen entrance off the driveway.  I hung up a pair of curtains
that normally go on the patio door this time of year, to replace the single panel
with a different curtain (that I had used the year before in my Shezebo screening)
to better coordinate the colors.  I like how these look so much they'll be staying,
so after I took down the autumnal/Thanksgiving gold brocade curtains I put up
the spring/summer curtains.  They let maximum light into the room during the
day, which is important this time of year, and if it gets too bright I can tweak the
built-in blinds in the patio doors to regulate the light flow.  

Still to be done - an extensive list to finish the kitchen re-do:

New countertops.  I have to get myself to Home Depot and get something ordered, but first I have to come up with a drawing and measurements.  How come they make it look so easy on those home improvement shows?  This isn't easy at all!

Tear out old and install new backsplash.  My new backsplash has been in my possession for some time.  I ordered this gorgeous porcelain ceramic tile Carrera marble look subway tile that comes in 12 x 12 sheets, in a smaller size "brick", given the smallish proportions of the kitchen and the limited amount of backsplash that will be covered, I didn't want to go with a larger size.  Once the countertops are in, I can get my "guy" in to tear out the old tile (hopefully it doesn't destroy the drywall underneath!) and put up the new tile and grout.  Yes, I've seen this done many times on HGTV and DIY network shows online, but I guess I'm adverse to risk and hard labor these days.  Plus I don't have the necessary tools and don't want to spend the $$$ to buy it!  I mean, how often will I ever use a tile cutter again?  NEVER.  I could rent what I need (maybe), but how would I get it home?  I don't drive - I mean, literally, I have never been behind the wheel of a car in my life and I have no clue how to drive although I do know all the rules of the road that nobody obeys anyway these days so what difference does it make, heh?  LOL! 

All the rest of the jazz
Painting cabinets first, but will probably be last to be done. Originally I was going to do white uppers and black lowers, then maybe dark grey lowers, but then I decided to just stick with white for uppers and lowers.  Now I only have to decide upon a white out of about 10 million shades and make up my ever-changing mind to do it myself or hire someone to do it.  Geez Louise!

Painting trim, that will be black and include the window frames, door frames and baseboards.  I have no idea what color I'm going to paint (or maybe stain) the transition piece from the dinette into the carpeted living room. I want to remove the carpet in the living room, but with the massive furniture pieces that are permanently in place in the living room that I cannot and will not even attempt to move by myself, there is no way.  Period, end of story.  So it's one of those up-in-the-air thingies that drive me nuts.

New light fixtures.  The boob fixture above the sink makes me cringe every time I look at it.  I try not to, believe me!  Same for the boob light in the hallway to the bedrooms and bathroom and the side hall to the kitchen entrance/basement stairs.  I know they were bought at Menard's because Menard's constantly runs specials on three boob lights for like $13 - for all three.  LOL! 

The problem is design paralysis when it comes to making a decision about which direction to go with the lighting.  I like far too many things, but like many others dreaming of new kitchen and dinette spaces that are all magically beautifully coordinated, I have champagne taste on a cheap boxed pink wine budget.  Every time I think I've made a decision, I find myself hours later veering off in an entirely different direction.  So I guess I just don't want to spend anything, but I hate the lights/fixtures that are over the dining table, in the center of the kitchen and over the sink.  HATE HATE HATE, the Trifecta of Hate. 

I'm sure I've forgotten some stuff - but I got the new smaller sized table and chairs that better fit the smaller space of this Maison Newton dinette, a new area rug for the dinette, and the white bookcase/storage unit - key purchases.

I'm trying to do all of this on a miniscule budget of a few thousand dollars.  Yeah, rutsa ruck, heh?  The BIG thing that was done already was to open up the wall all the way between the living room and dinette so now it's all one big flowing space.  It meant losing a partial wall in the living room that I used to be able to put furniture against. But it also meant closing up the separate door into the kitchen off of the bedroom/bathroom hallway - which I hated, and enabled me to slide the fridge from the dinette side of the room of that damn door into the kitchen proper where that door used to be, hooray!  That was a huge improvement, the fridge was moved to where it rightfully belonged and I had a dinette not infringed upon by the fridge. Can you imagine designing a kitchen and not leaving room for your refrigerator?  I mean - WHO DOES THAT?  And you should have seen the monstrous black wonder fridge that was shown with the house when I viewed it the first time - I swear it looked like it would eat you as you were sitting at the bar table they had in place of a civilized dining table.  How on earth did they feed two small kids at a bar table, I ask you??? (I was not so rude as to ask them). 

Okay, enough ranting and raving like a mad woman with dirty hair because a new season of Project Runway Allstars is starting in a few minutes, hooray!